VMware View vs Citrix XenDesktop: which one better? A question any VDI implementer probably gets quite often. And he looks through the internet and gets nothing concrete on the search results. While Citrix XD has been there for quite some time as a matured product and had been embraced by the industry wider than View untill View 5.0 and View 5.1 was released, VMware seems to be quite aggressive along with it's large partner based support for View.
I was pondering over a question: "If both the products from two competing VDI providers offer almost the same stuffs, why should one go for implementing VMWare View?" Because considering the maturity of the product, Citrix Xendesktop edges over VMware View. Well, I don't attempt to state here that View provides some unique features which do not exist in Citrix XenDesktop world. Rather, this post is more to analyze the key factors on deciding VMware View as one of the leading VDI solution.
1. Solid Integration with vSphere
With Server virtualization market being led by VMware it's simply easy for customers to be converted for the potential VDI projects. With VMware's product quality standards, excellent support model and Industry support, both from partner companies and evangelists it makes an easy transition to The next VDI project go with VMware VDI. Also, as a product VMware View tightly integrates with vSphere. It uses vSphere as a underlying layer for provisioning virtual desktops. It also uses the storage, compute and network resources/services of vSphere for the Virtual Desktops, much used the same way it is used for the Virtual Servers in vSphere. VIEW also uses the resource pools of vSphere DRS for provisioning the Virtual Desktops. Also the provisioning component of VIEW, called as VMware VIEW Composer is installed mostly on vSphere vCenter Server. Although with VIEW v5.1 it can be installed on a separate server instance as well. VIEW Composer enables composing or creating a pool of desktops on demand basis with the help of underlying vSphere layer.
(Look at the picture below)

2. Linked Clone Technology
View Composer component uses an interesting feature called “VMware Linked Clone Technology” which optimizes desktop storage space and improves image control. It is used with VMware vSphere Snapshot Technology to create a Master Image of a Virtual Desktop which later will be used as a Model Image or a Base Image. Now this this Base Image is used and created several incremental Linked Clones (used for each individual Virtual Desktops) which act as unique pointers for each user to a single virtual machine master. These Linked Clones each have unique identities, and they can be powered on, suspended or reconfigured
independently of the master image. Linked Clones can be refreshed at the administrator’s discretion, without affecting user data or settings, to ensure tight OS management and optimize storage resources.
(Refer to the picture above)
To make it easier, if you need 1000 virtual desktops of Windows7 (say each with 10GB space), VIEW will not create/provision 1000 virtual desktops with each as 10GB, which equals to total of 1000x10GB=10,000GB of storage required at the provisioning layer. Rather you will install Windows7 OS with the required settings/applications on a VM, take a snapshot of it and use it as a Master/Base Image. Now the 1000 Virtual Desktops will be created as Linked Clones linked to this Master Image. So, in nature these Linked Clones will be incremental in nature (delta VMs) and will use the Master Image for common files and folders for Windows7 Desktop. This drastically reduces the amount of SAN/Shared storage used to deploy the Virtual Desktops and also enables for a much faster deployment timeframe. Also if you put this Master Image on a SSD tier of storage it drastically reduces the logon traffic latency, commonly known as “Boot-Storm”. Linked Clones also helps to fast refresh the Virtual Desktops to reconcile. Additionally the patch management process of the desktops becomes cake-walk using Linked Clone with Snapshot Technology.
3. Terradici's PCoIP Protocol
There has been a lot of wave in the industry on Terradici’s PCoIP Protocol on delivering Virtual Desktops over UDP packets. Citrix HDX (or ICA) uses TCP as the transport layer protocol making the connection oriented method heavier for the packets whereas PCoIP uses UDP as transport layer where it is connectionless protocol structure. And apparently it makes the delivery mechanism faster, commonly used in VoIP phones as well. Currently PCoIP protocol based VDI solution can be only implemented in VMWare View and Microsoft RDS. Microsoft RDS has been a recent addition.
 PCoIP protocol comes with three essential features:
A) Host Rendering: with images being rendered on the Host rather than the client devices, the PCoIP protocol transmits only the encrypted pixels (not the data) across the network to the client which makes it possible to have stateless, decode-only client devices what we call "true zero clients" – with all the benefits they bring such as low maintenance, increased security, and cost savings.
B) Multi-Codec Display Processing: PCoIP effectively uses different codecs for different image types, text, video, graphics etc. and thus intelligently decomposes the images and optimizes the images encoding and delivery saving huge amount of bandwidth which is an extremely essential feature for any strong VDI candidate
C) Dynamically Adapts to Network Conditions: with advanced controls on PCoIP protocol settings, image quality delivery can be controlled as per the available bandwidth and it ensures responsive and interactive image experience to the end users.
4. Less Vendor Lock-in
This is an interesting point probably we often tend to ignore on VDI implementation. VMware View can be integrated with any standard hardware like F5 Security devices, load balancers for the complementary features required in a complete Mobile Secure Desktop Solution unlike other leading VDI providers where you are stuck with their Hardware appliances and solutions.
5. Easy to Install and Manage
VMware View in my opinion is extremely user friendly and easy to install, configure and manage than Citrix XenDesktop. Whether you agree or not, Citrix XD is much more complicated compared to VMware View, probably due to the fact that Citrix acquired all the different components of XD and bonded them together whereas in case of VIEW, VMware has specifically built all of the components for VIEW. Time to deploy a VDI solution with VMware View is much shorter than Citrix XD, in my humble opinion. Also thanks to these rising companies like Pivot3, Nutanix which makes custom hardware appliances specially for VMware View, the speed of deployment has gone much faster!
6. Wide range of Partner Support

As with vSphere, VMWare View as well enjoys wide range of partner support and joint development/support initiatives to create a Secure Mobile Virtual Desktop Solution. It ranges from giants like HP, Cisco, Dell, EMC, NetApp etc. to start-ups like Terradici, Pivot3, Nutanix to name a few.
7. Custom Hardware Appliances
Already mentioned above, now there are start-up companies developing a range of products called Hardware Appliances for VDI which tremendously fast provisions a VDI deployment right from POC stage to Production in easy scale-up fashion by adding additional appliance devices.
8. PCoIP Proxy for the Remote Clients
VMware View component named as “View Security Server” sits on the DMZ zone and thus gives a secure authentication entry-point to the existing LDAP/RADIUS servers. Since PCoIP uses UDP for transportation, it also acts as a PCoIP proxy to the underlying security layer and acts as an interface between the VIEW Clients and VIEW Connection Manager. (Refer to the picture on point no.1)
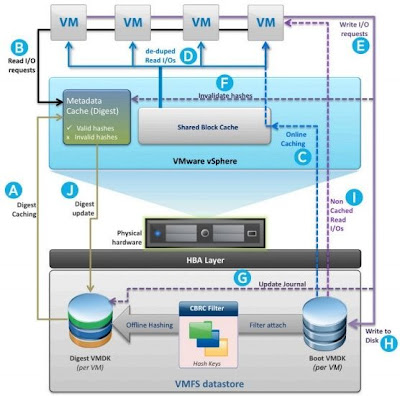
9. View Storage Accelerator & CBRC:
To make it simpler, CBRC (Content Based Read Caching) implemented as part of VIEW Storage Accelerator, caches the frequently accessed data from the Virtual Machines to the ESXi Hosts’ RAM Cache instead of fetching the information from the underlying storage and thus contributing reduce to the “Bootstorm” to a great extent. Studies show that View Storage accelerator helps to minimize the overall Total Cost of Ownership (TCO) in VMware View deployments by providing up to 80 percent reduction in peak IOPS and up to 65 percent reduction in peak throughput. (I have included a diagram below from CBRC Reference Architecture from VMware)
10. View Composer Array Integration (VCAI)
Quoting Narasimha K, VMware Product Manager, “VCAI is a new “Tech Preview” feature of VIEW v5.1 that leverages capabilities of VMware vSphere as well as some of the NAS storage arrays that have the VAAI (vSphere API for Array Integration) NAS native snapshot capability. This feature allows customers to offload the creation of linked clones to the storage array. It is used in conjunction with linked clone desktop pools and NFS datastores that are exported by NAS storage arrays such as NetApp and EMC.”
11. VMware View Planner
VIEW Planner much as vSphere Capacity Planner helps architects/consultants to create the test-load for the VDI project and provides output which act as potential input for design considerations for the VDI deployment in terms of Storage, Compute power etc.

12. vCOps for View
vCOps for VIEW provides end-to-end visibility into the health, performance and efficiency of virtual desktop infrastructure so desktop administrators can proactively ensure the best end user experience, avert incidents and eliminate bottlenecks. vCenter Operations Manager for View improves IT productivity and lowers the cost of owning and operating VDI environments. Compare it with your existing Microsoft SCOM Server doing for your Windows Servers in a typical DIY Datacenter.
13. Local Mode or Offline Desktops
Beauty of VMware View is that you can have a Virtual Desktop downloaded to your local machine’s local storage if you are using a thick Windows client. You can continue working on them in a disconnected mode and as soon as you connect back to the network it will synchronize the changes to the vSphere layer to the VM and it’s associated storage. It is extremely helpful in cases like you can have a checked in offline desk while you are on a flight journey and as soon as you connect back to the network, you can check out the offline desktop. To use this feature you need a VIEW component called “VMware View Transfer Server”

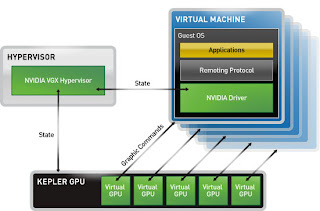 14. Full GPU Virtualization
VMware View and NVIDIA together presents industry’s first and only fully virtualized 3D graphics adapter, expanding the possible use case for virtual desktop workloads. This unique capability enabled users to run and remote basic 3D applications, graphics and Windows Aero experience that require DirectX or OpenGL without requiring any additional server hardware or specialized graphics adapters. So, the virtual desktops will use the virtualized GPU (much like your virtual CPU or vCPU) from the dedicated NVIDIA VGX card installed on a ESXi Host. I believe there are similar solution available from Terradici as well.
15. 32 Host Cluster Possible
Earlier only 8 ESXi host was possible whereas now you can have as many as 32 ESXi hosts using NFS as the underlying storage tier.
16. Radius Two Factor Authentication
With View v5.1, RADIUS support has been added to the two-factor authentication feature making it an extremely secure VDI implementation.
17. Access Physical Desktop remotely
with VMware View you can not only access a virtual desktop but also access a physical desktop running a VIEW Agent software through VIEW Client. This is particularly helpful in case of migrating some specific users from Physical to Virtual Desktops and probably in a testing environment.
I was pondering over a question: "If both the products from two competing VDI providers offer almost the same stuffs, why should one go for implementing VMWare View?" Because considering the maturity of the product, Citrix Xendesktop edges over VMware View. Well, I don't attempt to state here that View provides some unique features which do not exist in Citrix XenDesktop world. Rather, this post is more to analyze the key factors on deciding VMware View as one of the leading VDI solution.
1. Solid Integration with vSphere
With Server virtualization market being led by VMware it's simply easy for customers to be converted for the potential VDI projects. With VMware's product quality standards, excellent support model and Industry support, both from partner companies and evangelists it makes an easy transition to The next VDI project go with VMware VDI. Also, as a product VMware View tightly integrates with vSphere. It uses vSphere as a underlying layer for provisioning virtual desktops. It also uses the storage, compute and network resources/services of vSphere for the Virtual Desktops, much used the same way it is used for the Virtual Servers in vSphere. VIEW also uses the resource pools of vSphere DRS for provisioning the Virtual Desktops. Also the provisioning component of VIEW, called as VMware VIEW Composer is installed mostly on vSphere vCenter Server. Although with VIEW v5.1 it can be installed on a separate server instance as well. VIEW Composer enables composing or creating a pool of desktops on demand basis with the help of underlying vSphere layer.
(Look at the picture below)
2. Linked Clone Technology
View Composer component uses an interesting feature called “VMware Linked Clone Technology” which optimizes desktop storage space and improves image control. It is used with VMware vSphere Snapshot Technology to create a Master Image of a Virtual Desktop which later will be used as a Model Image or a Base Image. Now this this Base Image is used and created several incremental Linked Clones (used for each individual Virtual Desktops) which act as unique pointers for each user to a single virtual machine master. These Linked Clones each have unique identities, and they can be powered on, suspended or reconfigured
independently of the master image. Linked Clones can be refreshed at the administrator’s discretion, without affecting user data or settings, to ensure tight OS management and optimize storage resources.
(Refer to the picture above)
To make it easier, if you need 1000 virtual desktops of Windows7 (say each with 10GB space), VIEW will not create/provision 1000 virtual desktops with each as 10GB, which equals to total of 1000x10GB=10,000GB of storage required at the provisioning layer. Rather you will install Windows7 OS with the required settings/applications on a VM, take a snapshot of it and use it as a Master/Base Image. Now the 1000 Virtual Desktops will be created as Linked Clones linked to this Master Image. So, in nature these Linked Clones will be incremental in nature (delta VMs) and will use the Master Image for common files and folders for Windows7 Desktop. This drastically reduces the amount of SAN/Shared storage used to deploy the Virtual Desktops and also enables for a much faster deployment timeframe. Also if you put this Master Image on a SSD tier of storage it drastically reduces the logon traffic latency, commonly known as “Boot-Storm”. Linked Clones also helps to fast refresh the Virtual Desktops to reconcile. Additionally the patch management process of the desktops becomes cake-walk using Linked Clone with Snapshot Technology.
3. Terradici's PCoIP Protocol
There has been a lot of wave in the industry on Terradici’s PCoIP Protocol on delivering Virtual Desktops over UDP packets. Citrix HDX (or ICA) uses TCP as the transport layer protocol making the connection oriented method heavier for the packets whereas PCoIP uses UDP as transport layer where it is connectionless protocol structure. And apparently it makes the delivery mechanism faster, commonly used in VoIP phones as well. Currently PCoIP protocol based VDI solution can be only implemented in VMWare View and Microsoft RDS. Microsoft RDS has been a recent addition.

A) Host Rendering: with images being rendered on the Host rather than the client devices, the PCoIP protocol transmits only the encrypted pixels (not the data) across the network to the client which makes it possible to have stateless, decode-only client devices what we call "true zero clients" – with all the benefits they bring such as low maintenance, increased security, and cost savings.
B) Multi-Codec Display Processing: PCoIP effectively uses different codecs for different image types, text, video, graphics etc. and thus intelligently decomposes the images and optimizes the images encoding and delivery saving huge amount of bandwidth which is an extremely essential feature for any strong VDI candidate
C) Dynamically Adapts to Network Conditions: with advanced controls on PCoIP protocol settings, image quality delivery can be controlled as per the available bandwidth and it ensures responsive and interactive image experience to the end users.
4. Less Vendor Lock-in
This is an interesting point probably we often tend to ignore on VDI implementation. VMware View can be integrated with any standard hardware like F5 Security devices, load balancers for the complementary features required in a complete Mobile Secure Desktop Solution unlike other leading VDI providers where you are stuck with their Hardware appliances and solutions.
5. Easy to Install and Manage
VMware View in my opinion is extremely user friendly and easy to install, configure and manage than Citrix XenDesktop. Whether you agree or not, Citrix XD is much more complicated compared to VMware View, probably due to the fact that Citrix acquired all the different components of XD and bonded them together whereas in case of VIEW, VMware has specifically built all of the components for VIEW. Time to deploy a VDI solution with VMware View is much shorter than Citrix XD, in my humble opinion. Also thanks to these rising companies like Pivot3, Nutanix which makes custom hardware appliances specially for VMware View, the speed of deployment has gone much faster!
6. Wide range of Partner Support

As with vSphere, VMWare View as well enjoys wide range of partner support and joint development/support initiatives to create a Secure Mobile Virtual Desktop Solution. It ranges from giants like HP, Cisco, Dell, EMC, NetApp etc. to start-ups like Terradici, Pivot3, Nutanix to name a few.
Already mentioned above, now there are start-up companies developing a range of products called Hardware Appliances for VDI which tremendously fast provisions a VDI deployment right from POC stage to Production in easy scale-up fashion by adding additional appliance devices.
8. PCoIP Proxy for the Remote Clients
VMware View component named as “View Security Server” sits on the DMZ zone and thus gives a secure authentication entry-point to the existing LDAP/RADIUS servers. Since PCoIP uses UDP for transportation, it also acts as a PCoIP proxy to the underlying security layer and acts as an interface between the VIEW Clients and VIEW Connection Manager. (Refer to the picture on point no.1)
9. View Storage Accelerator & CBRC:
To make it simpler, CBRC (Content Based Read Caching) implemented as part of VIEW Storage Accelerator, caches the frequently accessed data from the Virtual Machines to the ESXi Hosts’ RAM Cache instead of fetching the information from the underlying storage and thus contributing reduce to the “Bootstorm” to a great extent. Studies show that View Storage accelerator helps to minimize the overall Total Cost of Ownership (TCO) in VMware View deployments by providing up to 80 percent reduction in peak IOPS and up to 65 percent reduction in peak throughput. (I have included a diagram below from CBRC Reference Architecture from VMware)

10. View Composer Array Integration (VCAI)
Quoting Narasimha K, VMware Product Manager, “VCAI is a new “Tech Preview” feature of VIEW v5.1 that leverages capabilities of VMware vSphere as well as some of the NAS storage arrays that have the VAAI (vSphere API for Array Integration) NAS native snapshot capability. This feature allows customers to offload the creation of linked clones to the storage array. It is used in conjunction with linked clone desktop pools and NFS datastores that are exported by NAS storage arrays such as NetApp and EMC.”
11. VMware View Planner
VIEW Planner much as vSphere Capacity Planner helps architects/consultants to create the test-load for the VDI project and provides output which act as potential input for design considerations for the VDI deployment in terms of Storage, Compute power etc.

12. vCOps for View
vCOps for VIEW provides end-to-end visibility into the health, performance and efficiency of virtual desktop infrastructure so desktop administrators can proactively ensure the best end user experience, avert incidents and eliminate bottlenecks. vCenter Operations Manager for View improves IT productivity and lowers the cost of owning and operating VDI environments. Compare it with your existing Microsoft SCOM Server doing for your Windows Servers in a typical DIY Datacenter.
13. Local Mode or Offline Desktops
Beauty of VMware View is that you can have a Virtual Desktop downloaded to your local machine’s local storage if you are using a thick Windows client. You can continue working on them in a disconnected mode and as soon as you connect back to the network it will synchronize the changes to the vSphere layer to the VM and it’s associated storage. It is extremely helpful in cases like you can have a checked in offline desk while you are on a flight journey and as soon as you connect back to the network, you can check out the offline desktop. To use this feature you need a VIEW component called “VMware View Transfer Server”
 14. Full GPU Virtualization
VMware View and NVIDIA together presents industry’s first and only fully virtualized 3D graphics adapter, expanding the possible use case for virtual desktop workloads. This unique capability enabled users to run and remote basic 3D applications, graphics and Windows Aero experience that require DirectX or OpenGL without requiring any additional server hardware or specialized graphics adapters. So, the virtual desktops will use the virtualized GPU (much like your virtual CPU or vCPU) from the dedicated NVIDIA VGX card installed on a ESXi Host. I believe there are similar solution available from Terradici as well.
15. 32 Host Cluster Possible
Earlier only 8 ESXi host was possible whereas now you can have as many as 32 ESXi hosts using NFS as the underlying storage tier.
16. Radius Two Factor Authentication
With View v5.1, RADIUS support has been added to the two-factor authentication feature making it an extremely secure VDI implementation.
17. Access Physical Desktop remotely
with VMware View you can not only access a virtual desktop but also access a physical desktop running a VIEW Agent software through VIEW Client. This is particularly helpful in case of migrating some specific users from Physical to Virtual Desktops and probably in a testing environment.